The donut hair bun is a chic and elegant hairstyle that has gained immense popularity in recent years. This versatile style is perfect for any occasion, whether it’s a casual day out, a formal event, or even a wedding. Not only is it easy to achieve, but it also keeps your hair neat and tidy, allowing you to flaunt your beautiful locks without any fuss. In this comprehensive guide, we will explore everything you need to know about making a donut hair bun, including tips, tricks, and variations to elevate your hairstyle game.
In this article, we will walk you through the step-by-step process of creating a donut hair bun, provide you with some helpful tips, and share some variations that will suit different hair types and occasions. By the end of this guide, you will be able to master the art of making the perfect donut hair bun effortlessly. So, let’s dive in and discover how to achieve this trendy hairstyle!
Before we get started, let’s take a look at the essential tools and materials you will need to create a donut hair bun. Having the right supplies will make the process smoother and help you achieve the desired look with ease.
Table of Contents
- Essential Tools and Materials
- Step-by-Step Guide to Making a Donut Hair Bun
- Tips and Tricks for a Perfect Donut Hair Bun
- Variations of the Donut Hair Bun
- Donut Hair Bun for Different Hair Types
- Common Mistakes to Avoid
- How to Maintain Your Donut Hair Bun
- Conclusion
Essential Tools and Materials
To create a beautiful donut hair bun, you will need a few essential tools and materials. Here’s a list to get you started:
- Hair ties
- Donut bun maker (or a pair of socks cut into a donut shape)
- Hairpins or bobby pins
- Hair spray (optional)
- Brush or comb
- Hair accessories (optional, for decoration)
Step-by-Step Guide to Making a Donut Hair Bun
Now that you have gathered all the necessary tools, it’s time to create your donut hair bun! Follow these simple steps:
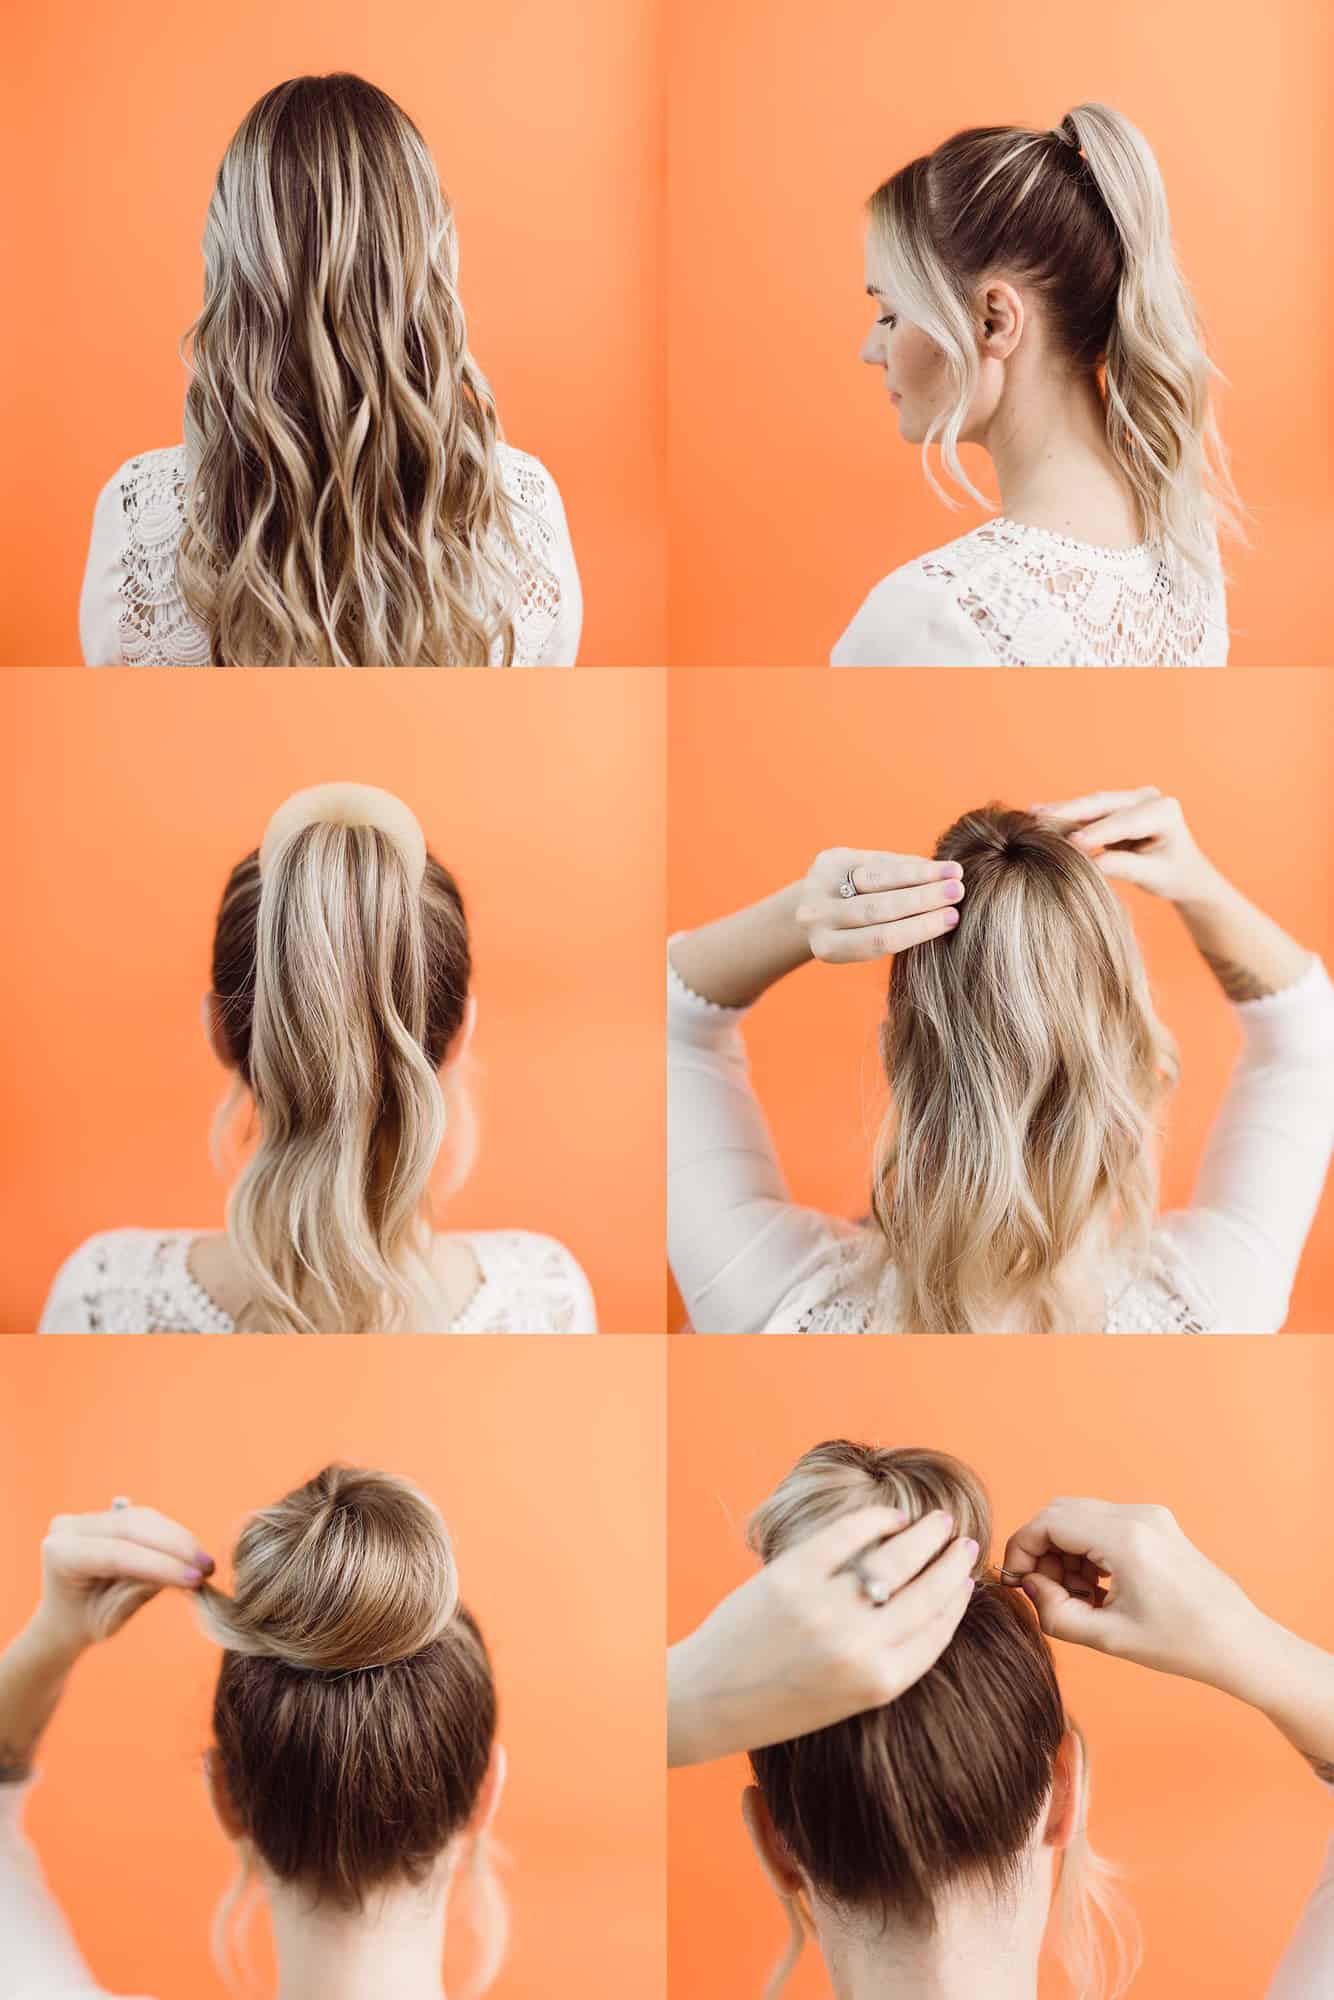
Step 1: Prepare Your Hair
Start with clean and dry hair. Brush your hair to remove any tangles and knots. If your hair is too silky or slippery, you can use some texturizing spray to give it a bit of grip.
Step 2: Create a High Ponytail
Using a hair tie, gather all of your hair into a high ponytail. The position of your ponytail will determine the height of your donut bun, so choose accordingly.
Step 3: Insert the Donut Bun Maker
Next, take your donut bun maker and slide it onto the base of your ponytail. Make sure the donut maker is at the base of your ponytail and your hair is draped over it.
Step 4: Roll Your Hair Around the Donut
Begin rolling your hair around the donut bun maker, working your way from the base of the ponytail to the tips of your hair. Tuck the ends of your hair under the donut as you go to create a neat bun shape.
Step 5: Secure Your Bun
Once your hair is wrapped around the donut maker, use hairpins or bobby pins to secure the bun in place. Make sure to pin it securely to avoid any slips.
Step 6: Adjust and Style
Adjust the bun to your liking, ensuring it looks even and neat. You can also pull out a few strands of hair around your face for a softer look or add hair accessories for a touch of elegance.
Tips and Tricks for a Perfect Donut Hair Bun
Here are some tips to help you achieve the perfect donut hair bun:
- Use a donut bun maker that matches your hair color for a seamless look.
- For a more textured bun, consider using a texturizing spray before styling.
- Practice makes perfect! Don't be discouraged if it doesn't look perfect on your first try.
- Experiment with different heights and placements of the bun for varied looks.
Variations of the Donut Hair Bun
The donut hair bun can be customized to fit various styles and occasions. Here are a few popular variations:
- Messy Bun: For a more relaxed look, you can create a messy donut bun by allowing some strands to fall out of the bun.
- Low Bun: Instead of a high ponytail, create a low ponytail for a sophisticated low bun style.
- Braided Bun: Incorporate braids into your donut bun for added texture and elegance.
Donut Hair Bun for Different Hair Types
Regardless of your hair type, you can achieve a beautiful donut hair bun. Here’s how:
For Straight Hair
Straight hair tends to hold the bun well. Just follow the steps above for a sleek and polished look.
For Wavy or Curly Hair
If you have wavy or curly hair, consider using a texturizing spray to help manage frizz and hold your bun in place.
For Thick Hair
Thick hair may require more pins to secure the bun. Make sure to distribute your hair evenly around the donut for a balanced look.
For Fine Hair
For fine hair, using a donut bun maker can create the illusion of volume. Consider adding some volumizing mousse before styling.
Common Mistakes to Avoid
Here are some common mistakes to avoid when creating a donut hair bun:
- Not securing the bun well enough, leading to slippage.
- Using a donut maker that is too small or too large for your hair.
- Skipping the texturizing spray, which can make styling difficult.
How to Maintain Your Donut Hair Bun
To keep your donut hair bun looking fresh throughout the day, consider the following tips:
- Use hair spray to secure your style and prevent flyaways.
- Carry some bobby pins with you for quick touch-ups if needed.
- Avoid touching your bun too much to maintain its shape.
Conclusion
Creating a donut hair bun is a simple and stylish way to keep your hair neat and fashionable. With the right tools and techniques, anyone can master this hairstyle. Remember to experiment with different styles and find what works best for you. Now it’s your turn to try it out! Share your thoughts in the comments below, and don’t forget to check out our other articles for more hairstyle inspiration!
Thank you for reading! We hope you found this guide helpful and that it inspires you to create beautiful hairstyles. Come back soon for more tips and tricks on hair and beauty!